Are you looking to free up some space on your OneDrive account? Deleting unnecessary files and folders can help you reclaim valuable storage. In this step-by-step guide, we will show you how to delete OneDrive storage, allowing you to manage your files more efficiently.
Step 1: Sign in to your OneDrive account
To begin the process of deleting your OneDrive storage, sign in to your account using your Microsoft credentials. Once you are signed in, you will have access to all your files and folders stored on OneDrive.
Step 2: Select the files or folders you want to delete
Next, navigate to the files or folders that you want to delete. You can choose multiple files or folders by holding down the Ctrl key (or Command key on a Mac) and clicking on each item. Alternatively, you can select all files and folders by pressing Ctrl+A (or Command+A on a Mac).
Step 3: Delete the selected files or folders
Once you have selected the files or folders you want to delete, right-click on one of the selected items and choose the “Delete” option from the context menu. A confirmation prompt will appear asking if you are sure you want to delete the selected items. Click “Yes” to proceed with the deletion.
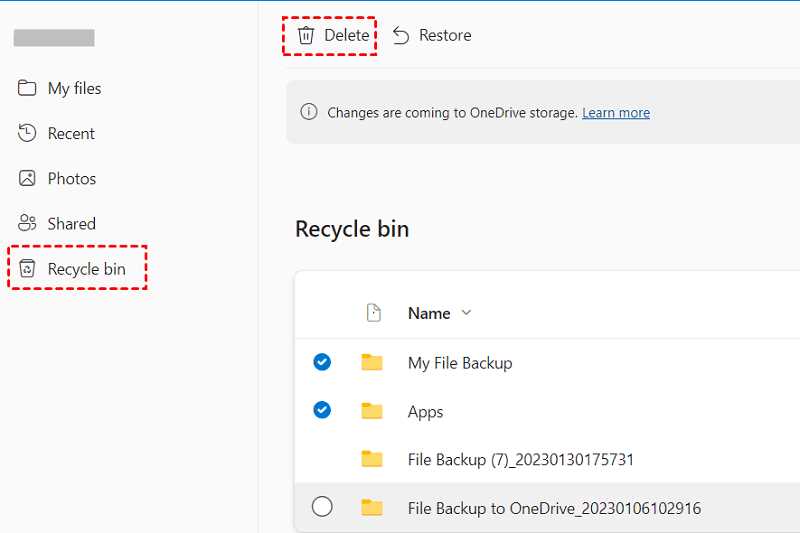
Step 4: Empty the Recycle Bin
Deleted files and folders are moved to the Recycle Bin, where they continue to take up storage space. To permanently delete them and free up storage, go to the Recycle Bin and click on the “Empty Recycle Bin” option. Confirm the action when prompted.
Step 5: Check your OneDrive storage
After completing the previous steps, it’s a good idea to check your OneDrive storage to ensure that the deleted files and folders are no longer taking up space. You can do this by going to the OneDrive settings and checking the available storage. If the storage has decreased, you have successfully deleted the unwanted files and freed up space on your OneDrive account.
By following these step-by-step instructions, you can easily delete OneDrive storage and optimize your file management. Remember to regularly review and delete unnecessary files to keep your OneDrive account organized and ensure you have enough storage for your important files.
Why Delete OneDrive Storage?
OneDrive is a cloud storage service provided by Microsoft that allows users to store and access their files from anywhere. While OneDrive offers many benefits, there may be instances where you want to delete your OneDrive storage.
There are several reasons why you might want to delete your OneDrive storage. One reason is if you no longer need the files and want to free up space on your device or in your OneDrive account. Another reason is if you want to switch to a different cloud storage service or if you no longer trust Microsoft with your data. Additionally, if you are experiencing issues with your OneDrive account or if you want to start fresh, deleting your OneDrive storage can be a good option.
Regardless of the reason, deleting your OneDrive storage is a straightforward process that can be done in just a few steps. In this guide, we will walk you through how to delete your OneDrive storage step-by-step.
Benefits of Deleting OneDrive Storage

Deleting OneDrive storage can provide several benefits for users who no longer need or want to use the service. Here are some of the key advantages:
1. Free up storage space: By deleting your OneDrive storage, you can free up valuable storage space on your device or computer. This can be especially beneficial if you are running out of storage or if you want to make room for other files and applications.
2. Enhanced privacy: Deleting your OneDrive storage can help protect your privacy by removing any sensitive or personal files that may have been stored in the cloud. This can be particularly important if you no longer trust the security of the service or if you want to ensure that your data is not accessible to anyone else.
3. Simplify file management: Deleting OneDrive storage can help simplify your file management process. Instead of having to manage files in multiple locations (e.g., on your device and in the cloud), you can consolidate all your files in one place and avoid the need to sync or backup files to the cloud.
4. Save on storage costs: If you are paying for additional storage on OneDrive, deleting your storage can help you save on storage costs. By eliminating the need for extra storage, you can reduce your expenses and allocate your resources more efficiently.
5. Start fresh: Deleting your OneDrive storage can give you a fresh start and allow you to reorganize your files and folders. This can be helpful if your current file structure is cluttered or if you want to create a new organizational system that better suits your needs.
Overall, deleting OneDrive storage can provide various benefits, including freeing up storage space, enhancing privacy, simplifying file management, saving on storage costs, and starting fresh. Consider these advantages when deciding whether to delete your OneDrive storage.
Step 1: Accessing OneDrive Settings
To delete storage on OneDrive, you will need to access the OneDrive settings. Follow the steps below to access the settings:
| 1. | Open the OneDrive website by typing “onedrive.live.com” into your web browser’s address bar and pressing Enter. |
| 2. | Sign in to your OneDrive account using your Microsoft account credentials. |
| 3. | Once you are signed in, click on the gear icon located in the top-right corner of the page. This will open a drop-down menu. |
| 4. | In the drop-down menu, click on “Options”. This will take you to the OneDrive settings page. |
By following these steps, you will be able to access the OneDrive settings and proceed with deleting storage from your OneDrive account.
Opening OneDrive on Your Device
To delete files from your OneDrive storage, you first need to open the OneDrive application on your device. Follow these steps to access OneDrive:
- Locate the OneDrive icon on your device’s home screen or in the app drawer.
- Tap on the OneDrive icon to launch the application.
- If prompted, sign in to your OneDrive account using your username and password.
- Once you are logged in, you will be able to access all the files and folders stored in your OneDrive storage.
Now that you have successfully opened OneDrive on your device, you can proceed with deleting files from your storage. Read on to learn how to delete files from OneDrive.
Locating the Settings Option

To delete your OneDrive storage, you will need to access the settings option. Here’s how:
- Open the OneDrive application on your device.
- Click on the “Settings” icon, usually represented by a gear or three dots.
- A dropdown menu will appear. Select “Settings” from the options.
- In the settings menu, navigate to the “Account” or “Storage” tab.
- Look for the option to “Delete OneDrive storage” or a similar phrase.
- Click on the option to delete your storage.
- Follow any additional prompts or confirmations to complete the deletion process.
By locating the settings option and following these steps, you will be able to delete your OneDrive storage and free up space on your device.
Step 2: Selecting Files and Folders to Delete

Once you have accessed your OneDrive storage, it’s time to decide which files and folders you want to delete. This step is crucial as it allows you to free up space and declutter your storage.
To begin, navigate to the location where your files and folders are stored on OneDrive. You can do this by clicking on the “Files” tab or by using the search bar to find specific items.
Once you are in the desired location, you can select individual files or folders by clicking on them. To select multiple items at once, hold down the “Ctrl” key on your keyboard while clicking on each item.
If you want to select all files and folders within a specific location, you can use the “Select All” option. This can usually be found in the toolbar at the top of the page or by right-clicking on the location and choosing “Select All” from the context menu.
After selecting the files and folders you wish to delete, you can proceed to the next step to permanently remove them from your OneDrive storage.
Note: Before deleting any files or folders, make sure to double-check that you have selected the correct items. Once deleted, they cannot be recovered.
Choosing Files for Deletion

When it comes to deleting files from your OneDrive storage, it’s important to carefully choose which files you want to remove. Here are some steps to help you decide:
| Step | Description |
|---|---|
| 1 | Assess your storage needs: Determine how much storage space you currently have and how much you need. This will help you prioritize which files to delete. |
| 2 | Identify duplicate files: Look for files that exist in multiple locations or have similar content. Deleting duplicates can free up a significant amount of storage. |
| 3 | Review file usage: Analyze which files you haven’t accessed or modified in a long time. These files may no longer be necessary and can be safely deleted. |
| 4 | Consider file size: Large files, such as videos or high-resolution images, can take up a substantial amount of storage. Deleting these files can quickly free up space. |
| 5 | Backup important files: Before deleting any files, make sure to create a backup of important documents or files that you may need in the future. |
By following these steps, you can effectively choose which files to delete from your OneDrive storage, ensuring that you optimize your storage space and keep only the files that are necessary.
Selecting Folders for Deletion
When it comes to deleting storage from your OneDrive account, it’s important to carefully select the folders you want to remove. This ensures that you don’t accidentally delete any important files or folders that you still need.
To begin the process, open your OneDrive account and navigate to the folder view. Take your time to review the folders and subfolders stored in your account. Consider which ones are no longer necessary or contain files that you no longer need.
Once you have identified the folders you want to delete, select them by clicking on the checkbox next to each folder’s name. You can select multiple folders at once by holding down the Ctrl key (or Command key on a Mac) while clicking on the folders.
After selecting the folders, look for the delete option. This may be located in the toolbar at the top of the page or in a menu accessed by right-clicking on one of the selected folders. Click on the delete option to initiate the deletion process.
Before confirming the deletion, double-check that you have selected the correct folders. Once you confirm the deletion, the selected folders and their contents will be permanently removed from your OneDrive storage.
Remember, deleting folders from your OneDrive storage is irreversible, so it’s crucial to be certain of your selections before proceeding. Take the time to review your folders and ensure that you have backed up any important files before deleting them.