Converting a document from Word to Excel can be a useful skill to have, especially if you need to extract data or perform calculations on the information in the document. Whether you’re a student, a professional, or just someone who wants to organize their data more efficiently, this step-by-step guide will show you how to convert a Word document to Excel.
Step 1: Open the Word document
The first step in converting a Word document to Excel is to open the document you want to convert. You can do this by double-clicking on the document file or by opening Microsoft Word and selecting the document from the recent files list.
Step 2: Select and copy the data
Next, you’ll need to select and copy the data you want to convert to Excel. This can be done by clicking and dragging your mouse over the desired text or by using the keyboard shortcut Ctrl + A to select all the text in the document. Once the text is selected, use the keyboard shortcut Ctrl + C to copy the text to the clipboard.
Step 3: Open Excel and create a new workbook
Now it’s time to open Microsoft Excel and create a new workbook. You can do this by clicking on the Excel icon on your desktop or by searching for Excel in the Start menu. Once Excel is open, click on the “File” tab in the top left corner and select “New” to create a new workbook.
Step 4: Paste the data into Excel
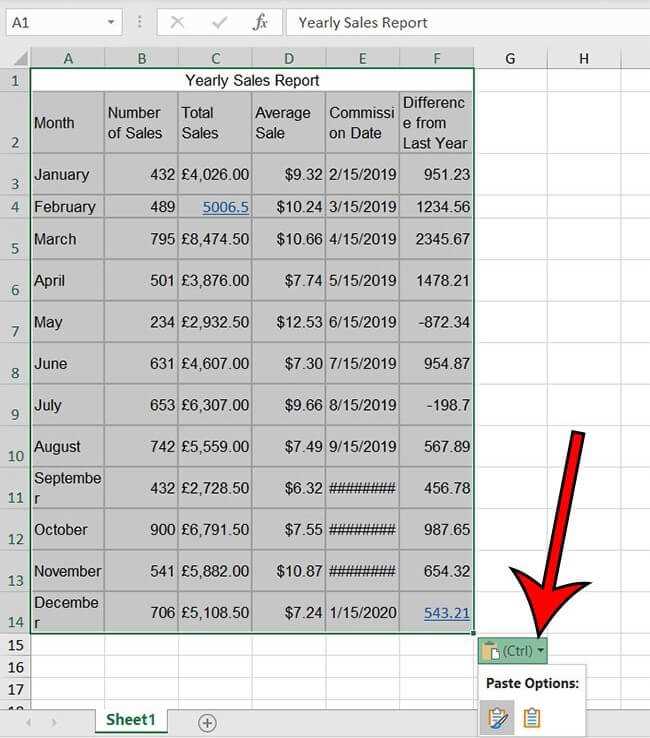
With the new workbook open, you can now paste the data from the Word document into Excel. To do this, click on the first cell in the Excel worksheet where you want the data to be pasted, and then use the keyboard shortcut Ctrl + V to paste the data from the clipboard into Excel. The data from the Word document should now be displayed in the Excel worksheet.
Step 5: Format and organize the data
Finally, you’ll need to format and organize the data in Excel to make it more readable and usable. This can include adjusting column widths, applying formatting to numbers or dates, and adding headers or titles to the worksheet. Take some time to explore the various formatting options in Excel to make the data look exactly how you want it.
By following these step-by-step instructions, you can easily convert a Word document to Excel and unlock the full potential of your data. Whether you’re analyzing financial information, creating charts and graphs, or simply organizing your information more effectively, Excel provides a powerful toolset to help you get the job done.
Section 1: Preparing the Word Document
To convert a Word document to Excel, you need to prepare the Word document beforehand.
Here are the steps to follow:
Step 1: Open the Word document that you want to convert to Excel.
Step 2: Review the content of the Word document and make sure it is organized in a way that can be easily converted to Excel.
Step 3: Check if there are any tables or tabular data in the Word document. If there are, ensure that the tables are properly formatted and aligned.
Step 4: Remove any unnecessary formatting, such as bold or italic text, as it may interfere with the conversion process.
Step 5: Ensure that the text in the Word document is clear and legible. If necessary, adjust the font size or style to improve readability.
Step 6: Save the Word document with a recognizable name and location on your computer.
By following these steps, you will be ready to convert your Word document to Excel.
Step 1: Open the Word Document
To convert a Word document to Excel, you first need to open the Word document that you want to convert. This can be done by following these steps:
- Locate the Word document on your computer. You can do this by navigating to the folder where the document is saved.
- Double-click on the Word document to open it. This will launch Microsoft Word and display the contents of the document.
Once the Word document is open, you can proceed to the next step to convert it to Excel.
Step 2: Review the Document Structure

Before converting a Word document to Excel, it is important to review the structure of the document. This step will help ensure that the data is organized in a way that can be easily transferred to an Excel spreadsheet.
First, open the Word document that you want to convert. Take a moment to familiarize yourself with the layout and formatting of the document. Pay attention to any tables, lists, or other structured elements that may be present.
Next, consider how the data is organized within the document. Are there any headers or subheadings that can be used as column headings in Excel? Are there any specific sections or paragraphs that contain the data you want to transfer?
One helpful technique is to create a table in Word to represent the data you want to convert. This can make it easier to visualize how the data will be organized in Excel. To create a table, select the relevant data and click on the “Insert” tab in the Word toolbar. Then, click on the “Table” button and choose “Insert Table” from the dropdown menu.
Once you have reviewed the document structure and identified the data you want to convert, you are ready to proceed to the next step: extracting the data from the Word document and transferring it to Excel.
Step 3: Format the Document for Conversion
Once you have opened the Word document that you want to convert to Excel, it’s important to format the document properly to ensure a smooth conversion process. Follow these steps to format the document:
1. Remove any unnecessary formatting: Before converting the document, it’s best to remove any unnecessary formatting such as bold or italicized text, different font sizes, or special characters. This will help ensure that the data is properly transferred to Excel.
2. Check for consistent data: Make sure that the data in the Word document is consistent and follows a similar format. For example, if you have a column with dates, make sure that all the dates are in the same format (e.g., dd/mm/yyyy or mm/dd/yyyy). Consistent data will make it easier to organize and analyze the data in Excel.
3. Organize the data into tables: If your Word document contains multiple sections or paragraphs, it’s a good idea to organize the data into tables. This will make it easier to convert the data to Excel and work with it later. Use the table formatting options in Word to create tables and adjust the column widths as needed.
4. Use headers and footers: If your Word document has headers or footers, make sure to remove them or adjust them accordingly. Headers and footers may interfere with the conversion process and can cause issues when importing the data into Excel.
5. Save the document: Once you have formatted the document, save it in the Word format (.doc or .docx) to preserve the formatting changes you made. This will ensure that the document is ready for conversion to Excel.
By following these steps, you can properly format your Word document for conversion to Excel. This will help ensure that the data is accurately transferred and organized in the Excel spreadsheet.
Section 2: Converting the Word Document to Excel
Once you have your Word document ready, it’s time to convert it to Excel. Converting a Word document to Excel can be a useful way to organize and analyze data that is already in a written format.
To convert a Word document to Excel, follow these steps:
Step 1: Open Microsoft Excel on your computer.
Step 2: Click on the “File” tab in the top left corner of the Excel window.
Step 3: Select “Open” from the drop-down menu.
Step 4: Navigate to the location where your Word document is saved.
Step 5: Select the Word document you want to convert and click on the “Open” button.
Step 6: A dialog box will appear asking how you want to open the document. Select “Open as read-only” and click on the “OK” button.
Step 7: The Word document will now open in Excel. You may see some formatting changes, but the text and data should remain intact.
Step 8: Review the converted document in Excel and make any necessary adjustments or formatting changes.
Step 9: Once you are satisfied with the conversion, save the Excel file by clicking on the “File” tab and selecting “Save” or “Save As”.
That’s it! You have successfully converted a Word document to Excel. Now you can take advantage of Excel’s powerful features to analyze and manipulate your data.
Step 1: Save the Word Document as a Text File
To convert a Word document to Excel, you first need to save the Word document as a text file. This step is necessary because Excel can only import text files, not Word documents directly.
To save the Word document as a text file, follow these steps:
- Open the Word document that you want to convert.
- Click on the “File” tab in the top left corner of the screen.
- Select the “Save As” option from the drop-down menu.
- In the “Save As” dialog box, choose a location on your computer where you want to save the text file.
- Enter a name for the text file in the “File name” field.
- In the “Save as type” drop-down menu, select “Plain Text (*.txt)”.
- Click the “Save” button to save the Word document as a text file.
Once you have saved the Word document as a text file, you are ready to proceed to the next step of the conversion process.
Step 2: Open Excel and Create a New Workbook
Once you have converted your Word document to an Excel file, it’s time to open Excel and create a new workbook. Excel is a powerful spreadsheet program that allows you to organize and analyze data in a tabular format.
To open Excel, you can either click on the Excel icon on your desktop or search for it in the Start menu. Once Excel is open, you will see a blank workbook with a grid of cells.
To create a new workbook, you can go to the “File” tab in the top left corner of the Excel window and click on “New.” This will open a list of templates and options for creating a new workbook. You can choose a blank workbook to start from scratch or select a template that suits your needs.
Alternatively, you can use the keyboard shortcut “Ctrl + N” to create a new workbook quickly.
Once you have created a new workbook, you can start entering data or importing data from your converted Word document. Excel provides various tools and features to manipulate and analyze your data, making it easier to work with large amounts of information.
| Tip: | If you want to convert specific sections or tables from your Word document to Excel, you can copy and paste them directly into the new workbook. This will preserve the formatting and structure of the data, saving you time and effort. |
Now that you have opened Excel and created a new workbook, you are ready to proceed to the next step of the conversion process.
Step 3: Import the Text File into Excel
Now that you have converted your Word document to a text file, it’s time to import it into Excel. Follow these steps to complete the process:
1. Open Excel and create a new workbook.
2. Go to the “Data” tab in the Excel ribbon and click on “From Text/CSV”.
3. In the “Import Text File” dialog box, locate and select the text file that you converted from your Word document.
4. Click on the “Import” button.
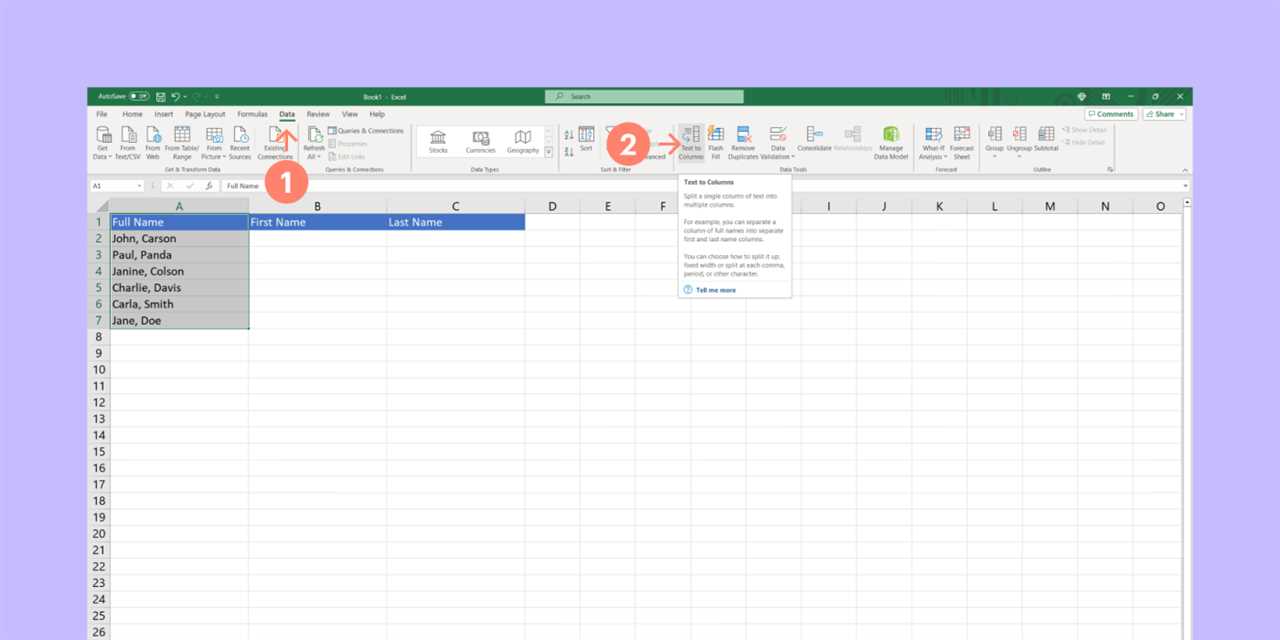
5. In the “Text Import Wizard” dialog box, choose “Delimited” as the file type and click “Next”.
6. Select the delimiter that was used in your Word document to separate the data (e.g., comma, tab, semicolon) and click “Next”.
7. Choose the appropriate data format for each column in your text file and click “Finish”.
8. In the “Import Data” dialog box, select the location where you want to place the imported data (e.g., a new worksheet, an existing worksheet) and click “OK”.
9. Excel will import the text file and display the data in the selected location.
By following these steps, you can easily convert and import your Word document into an Excel spreadsheet, allowing you to work with the data in a more organized and structured manner.