
When it comes to working with documents in Word, one of the most useful features is the ability to compare them. Whether you’re collaborating with colleagues or reviewing your own work, being able to easily identify changes between two versions of a document can save you time and effort. In this step-by-step guide, we’ll show you how to compare documents in Word and make the most of this powerful tool.
First, open the two documents you want to compare in Word. You can do this by clicking on the “File” tab, selecting “Open,” and then choosing the documents from your computer or cloud storage. Once both documents are open, go to the “Review” tab in the Word toolbar.
Next, click on the “Compare” button in the “Compare” group. A drop-down menu will appear, giving you several options for comparing documents. Choose the “Compare…” option to open the “Compare Documents” dialog box.
In the “Compare Documents” dialog box, select the original document from the “Original document” drop-down menu. Then, choose the revised document from the “Revised document” drop-down menu. You can also specify a name for the comparison document in the “Comparison document” field. Once you’ve made your selections, click on the “OK” button.
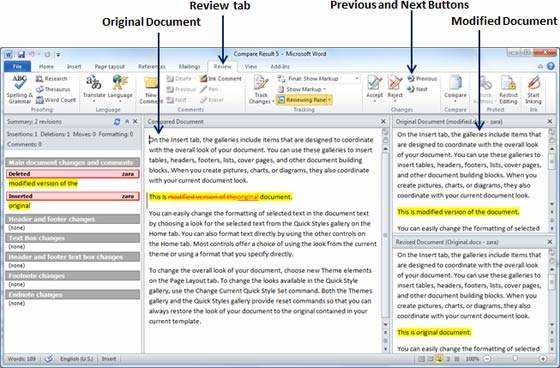
Word will now compare the two documents and display the changes in a new document. Deleted text will be shown with a strikethrough, while inserted text will be highlighted. You can navigate through the changes using the “Previous” and “Next” buttons in the “Changes” group on the “Review” tab. You can also accept or reject individual changes by right-clicking on them and selecting the appropriate option.
By following these simple steps, you can easily compare documents in Word and streamline your editing and reviewing process. Whether you’re working on a team project or revising your own work, this feature can help you identify and address changes quickly and efficiently. So, next time you need to compare documents in Word, remember these steps and make the most of this powerful tool.
Understanding the Importance of Document Comparison

Documents play a crucial role in various aspects of our lives, whether it’s for work, education, or personal use. However, with the increasing amount of information we deal with on a daily basis, it can become challenging to keep track of changes and updates made to these documents.
That’s where document comparison comes in. By comparing documents, we can easily identify and understand the differences between two versions of a document. This process allows us to track changes, ensure accuracy, and maintain consistency in our work.
Microsoft Word provides a powerful tool for comparing documents, making it easier for us to analyze and review changes made to our files. Whether you’re collaborating with colleagues on a project or reviewing your own work, the ability to compare documents in Word can save you time and effort.
When comparing documents in Word, you can easily spot additions, deletions, and modifications made to the text, formatting, and even comments. This feature is especially useful when working on legal documents, contracts, academic papers, or any other type of document that requires precision and accuracy.
By using the document comparison feature in Word, you can ensure that you haven’t missed any important changes, avoid errors, and maintain the integrity of your documents. It also allows you to collaborate effectively with others by providing a clear overview of the changes made.
In conclusion, understanding the importance of document comparison is crucial in today’s fast-paced world. By utilizing the tools available in Word, we can easily compare and analyze documents, ensuring accuracy, consistency, and efficiency in our work.
Why Document Comparison is Essential for Accuracy

When working with documents in Word, it is crucial to compare them to ensure accuracy and maintain the integrity of the content. Document comparison allows you to identify any differences or discrepancies between two or more documents, making it easier to spot errors, inconsistencies, or missing information.
By comparing documents in Word, you can ensure that the final version is error-free and meets the required standards. This is particularly important when collaborating with others on a project or when reviewing and editing your own work.
Document comparison in Word provides a systematic and efficient way to review and analyze documents side by side. It allows you to easily identify changes, additions, or deletions made between different versions of a document. This can be especially useful when working on legal contracts, academic papers, or any other type of document where accuracy and precision are paramount.
By using the built-in document comparison tools in Word, you can save time and effort compared to manually reviewing and comparing documents. The software highlights the differences between documents, making it easier to focus on specific areas that require attention. This ensures that no important details are overlooked and that the final document is as accurate as possible.
In addition to accuracy, document comparison also helps to maintain consistency throughout your documents. It allows you to ensure that formatting, styles, and content are consistent across different versions. This is particularly important when working on large projects or when collaborating with multiple authors.
Overall, document comparison is an essential step in the editing and proofreading process. It helps to ensure that your documents are error-free, consistent, and accurate. By utilizing the document comparison tools in Word, you can streamline your workflow and produce high-quality documents with confidence.
The Benefits of Using Document Comparison Tools

When it comes to working with documents in Word, knowing how to compare them can be a valuable skill. Document comparison tools offer a range of benefits that can help streamline your work and improve your productivity.
One of the main advantages of using document comparison tools is the ability to easily identify changes between two versions of a document. This can be especially useful when collaborating with others or when reviewing your own work. By comparing documents, you can quickly see what has been added, deleted, or modified, saving you time and effort in the editing process.
Document comparison tools also provide a clear visual representation of the differences between documents. Changes are usually highlighted, making it easy to spot them at a glance. This can be particularly helpful when dealing with lengthy or complex documents, as it allows you to focus on the areas that have been changed without having to read through the entire document.
Furthermore, document comparison tools often offer additional features that can enhance your workflow. For example, some tools allow you to merge changes from multiple versions of a document, making it easier to consolidate feedback and revisions. Others may provide options for generating reports or exporting comparison results for further analysis.
Overall, learning how to compare documents in Word and utilizing document comparison tools can greatly improve your efficiency and accuracy when working with written content. Whether you are a student, a professional, or simply someone who frequently works with documents, having the ability to compare and analyze changes can be a valuable asset.
So, next time you find yourself needing to compare two versions of a document, consider using a document comparison tool. You’ll be amazed at how much time and effort it can save you, and how it can help you produce higher quality work.
Step 1: Open the Documents You Want to Compare
When it comes to comparing documents in Word, the first step is to open the documents you want to compare. This is an essential step in the process, as it allows you to see the differences between the two documents side by side.
To open the documents, follow these steps:
- Launch Microsoft Word on your computer.
- Click on the “File” tab in the top left corner of the screen.
- Select “Open” from the drop-down menu.
- Navigate to the location where the documents are saved.
- Select the first document you want to compare and click “Open”.
- Repeat the previous step for the second document.
Once you have opened both documents, you will be able to view them side by side on your screen. This will make it easier for you to compare the content and formatting of the documents.
By following these simple steps, you can easily open the documents you want to compare in Word and proceed to the next steps of the comparison process.
Locating and Opening the Documents in Microsoft Word

Before you can compare documents in Microsoft Word, you need to locate and open the files you want to compare. Here’s how:
- Launch Microsoft Word on your computer.
- Click on the “File” tab in the top left corner of the screen.
- Select “Open” from the drop-down menu.
- Navigate to the folder where your documents are stored.
- Click on the first document you want to compare.
- Hold down the “Ctrl” key on your keyboard and click on the second document you want to compare. This will allow you to select multiple files.
- Click on the “Open” button.
Once you have opened the documents in Microsoft Word, you can proceed to compare them using the built-in document comparison feature. This feature allows you to easily identify and review the differences between the two documents, making it a valuable tool for editing and proofreading.
Ensuring the Documents are in the Correct Format

Before comparing documents in Word, it is important to ensure that both documents are in the correct format. This will help to ensure accurate and reliable results.
To begin, make sure that both documents are saved in the Word format (.docx) to ensure compatibility. If one of the documents is saved in a different format, such as .pdf or .txt, you will need to convert it to Word format before proceeding.
Next, check that the documents have the same font, font size, and formatting. Differences in font or formatting can affect the comparison results, so it is important to ensure consistency. Use the “Styles” feature in Word to apply a consistent style to both documents.
In addition, ensure that both documents have the same page layout, including margins, orientation, and paper size. Any differences in these settings can affect the way the documents are displayed and compared.
Lastly, check that both documents have the same line spacing and paragraph formatting. Differences in line spacing or paragraph formatting can cause discrepancies in the comparison results.
By taking these steps to ensure that the documents are in the correct format, you can compare them accurately and effectively using Word’s built-in comparison feature.
Step 2: Access the Compare Documents Feature

To compare documents in Word, you need to access the Compare Documents feature. This feature allows you to easily compare two documents and identify any differences between them. Here’s how you can access this feature:
| Step 1: | Open Microsoft Word on your computer. |
| Step 2: | Click on the “Review” tab at the top of the Word window. |
| Step 3: | In the “Review” tab, locate the “Compare” group. |
| Step 4: | Click on the “Compare” button in the “Compare” group. |
| Step 5: | A drop-down menu will appear. Select the “Compare…” option from the menu. |
Once you have accessed the Compare Documents feature, you will be able to choose the documents you want to compare and customize the comparison settings. This feature is a powerful tool that can save you time and effort when comparing multiple versions of a document. Now that you know how to access it, you can easily compare documents in Word and identify any changes or differences between them.
Locating the Compare Documents Option in the Word Menu
If you’re wondering how to compare documents in Word, the first step is to locate the Compare Documents option in the Word menu. This feature allows you to easily compare two documents and identify any differences between them. Here’s how to find it:
- Open Microsoft Word on your computer.
- Click on the “File” tab in the top left corner of the screen.
- In the dropdown menu, select “Open” to open the first document you want to compare.
- Once the document is open, go back to the “File” tab and click on it again.
- This time, select “Open” once more to open the second document you want to compare.
- Now, go to the “Review” tab in the Word menu.
- In the “Review” tab, you will find the “Compare” group.
- Click on the “Compare” button in the “Compare” group.
- A dropdown menu will appear, and you can select “Compare” from the options.
- Word will then open a new document that displays the compared versions of the two documents side by side.
By following these steps, you will be able to locate the Compare Documents option in the Word menu and begin comparing your documents. This feature can be particularly useful when collaborating with others or when reviewing changes made to a document over time. Now that you know how to find it, you can easily compare documents in Word and streamline your editing process.


