
npm (Node Package Manager) is a powerful tool that allows developers to easily manage and install packages and dependencies for their JavaScript projects. If you are using Visual Studio for your development environment, you may be wondering how to install npm and get started with using it. In this step-by-step guide, we will walk you through the process of installing npm in Visual Studio.
Step 1: Install Node.js
The first step in installing npm in Visual Studio is to install Node.js. npm is actually bundled with Node.js, so by installing Node.js, you will automatically get npm as well. To install Node.js, you can visit the official Node.js website and download the installer for your operating system. Follow the installation instructions provided by the installer to complete the installation process.
Step 2: Verify the Installation
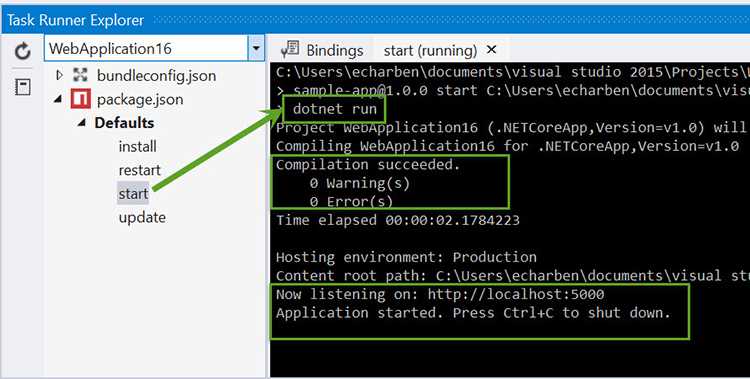
Once you have installed Node.js, you can verify that npm has been installed by opening a command prompt or terminal window and running the following command:
npm -v
If npm is installed correctly, you should see the version number of npm displayed in the command prompt or terminal window. This confirms that npm has been successfully installed on your system.
Step 3: Integrate npm with Visual Studio
Now that you have npm installed, you can integrate it with Visual Studio. Open Visual Studio and navigate to the project where you want to use npm. Right-click on the project in the Solution Explorer and select “Manage NuGet Packages” from the context menu. In the NuGet Package Manager window, search for “npm” and install the npm package. This will add the necessary files and configurations to your project to enable npm support.
Congratulations! You have successfully installed npm in Visual Studio. You can now start using npm to manage packages and dependencies for your JavaScript projects within the familiar Visual Studio environment.
Section 1: Installing Visual Studio
Visual Studio is a powerful integrated development environment (IDE) that allows developers to create, debug, and deploy applications. In this section, we will learn how to install Visual Studio on your computer.
To install Visual Studio, follow these steps:
- Go to the official Visual Studio website.
- Click on the “Download” button.
- Choose the version of Visual Studio that is compatible with your operating system.
- Run the downloaded installer file.
- Follow the on-screen instructions to complete the installation process.
Once the installation is complete, you will have Visual Studio installed on your computer. You can now start using it to develop your applications.
Note: Visual Studio is a large software package, so the installation process may take some time depending on your internet connection speed and computer performance.
Now that you have Visual Studio installed, let’s move on to the next section where we will learn how to install npm.
Step 1: Downloading Visual Studio
To install npm in Visual Studio, you first need to download and install Visual Studio on your computer. Visual Studio is a powerful integrated development environment (IDE) that provides a wide range of tools and features for building applications.
Here’s how to download Visual Studio:
- Go to the Visual Studio website at https://visualstudio.microsoft.com/.
- Click on the “Download” button to start the download process.
- Choose the edition of Visual Studio that you want to download. There are different editions available, such as Visual Studio Community, Visual Studio Professional, and Visual Studio Enterprise. Choose the edition that best suits your needs.
- Once you have selected the edition, click on the “Download” button to start the download.
- Wait for the download to complete. The download time may vary depending on your internet connection speed.
- Once the download is complete, run the downloaded installer file.
- Follow the on-screen instructions to install Visual Studio on your computer.
- After the installation is complete, launch Visual Studio to start using it.
Now that you have Visual Studio installed on your computer, you can proceed to the next step to install npm in Visual Studio.
Step 2: Installing Visual Studio
Now that you have learned how to install npm, the next step is to install Visual Studio. Visual Studio is a powerful integrated development environment (IDE) that provides a wide range of tools and features for building and debugging applications.
To install Visual Studio, follow these steps:
- Go to the official Visual Studio website.
- Click on the “Download” button.
- Choose the version of Visual Studio that is compatible with your operating system.
- Click on the downloaded file to start the installation process.
- Follow the on-screen instructions to complete the installation.
Once Visual Studio is installed, you will have a powerful development environment that will allow you to write and run your npm scripts with ease. You can also take advantage of the various features and tools provided by Visual Studio to enhance your development workflow.
With Visual Studio and npm installed, you are now ready to start building and managing your JavaScript projects. In the next step, we will learn how to create a new npm project in Visual Studio.
Step 3: Configuring Visual Studio
After successfully installing npm in Visual Studio, the next step is to configure it properly. Here’s how you can do it:
- Open Visual Studio and go to the “Tools” menu.
- Select “Options” from the dropdown menu.
- In the Options window, navigate to “Projects and Solutions” and then “Web Package Management”.
- Under “Package Management”, select “npm” from the dropdown menu.
- Click on the “Apply” button to save the changes.
By configuring Visual Studio to use npm, you will be able to easily manage and install packages for your projects. This will make your development process more efficient and streamlined.
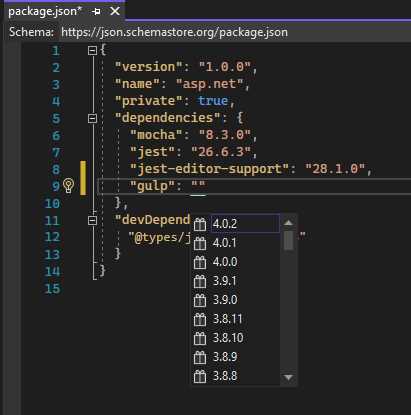
Section 2: Installing npm
In this section, we will guide you through the process of installing npm in Visual Studio. Npm, which stands for Node Package Manager, is a package manager for JavaScript that allows you to easily install and manage dependencies for your projects.
To install npm in Visual Studio, follow these steps:
- Open Visual Studio.
- Click on “Extensions” in the top menu.
- Select “Manage Extensions” from the dropdown menu.
- In the “Extensions and Updates” window, click on “Online” in the left sidebar.
- Type “npm” in the search bar and press Enter.
- Click on the “npm Package Manager” extension in the search results.
- Click on the “Download” button to start the installation process.
- Once the installation is complete, restart Visual Studio.
- After restarting, you can verify that npm is installed by opening the “Package Manager Console” from the “View” menu.
- In the Package Manager Console, type “npm -v” and press Enter. If npm is installed correctly, you should see the version number.
Congratulations! You have successfully installed npm in Visual Studio. Now you can start using npm to install and manage packages for your JavaScript projects.


