
If you have recently purchased a Mac M1 and want to take advantage of the vast collection of software packages available for macOS, you’ll need to install Homebrew. Homebrew is a popular package manager that allows you to easily install and manage software on your Mac. In this step-by-step guide, we will walk you through the process of installing Homebrew on your Mac M1.
Before we begin, it’s important to note that Homebrew has recently released support for Mac M1, so you can now install and use Homebrew on your new Mac without any issues. With Homebrew, you can install a wide range of software packages, including development tools, utilities, and applications, all from the command line.
To install Homebrew on your Mac M1, follow these simple steps:
Step 1: Open Terminal
First, open the Terminal application on your Mac. You can find it by searching for “Terminal” in Spotlight or by navigating to Applications -> Utilities -> Terminal.
Step 2: Install Homebrew
Once you have the Terminal open, copy and paste the following command into the Terminal window and press Enter:
/bin/bash -c “$(curl -fsSL https://raw.githubusercontent.com/Homebrew/install/HEAD/install.sh)”
This command will download and run the Homebrew installation script. You may be prompted to enter your password during the installation process.
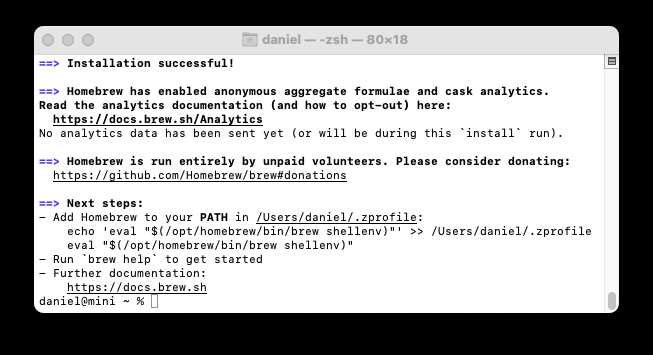
Step 3: Verify the Installation
After the installation is complete, you can verify that Homebrew is installed correctly by running the following command in the Terminal:
brew –version
If Homebrew is installed correctly, you should see the version number displayed in the Terminal.
Step 4: Start Using Homebrew
Now that Homebrew is installed on your Mac M1, you can start using it to install software packages. To install a package, simply run the following command in the Terminal:
brew install [package-name]
Replace [package-name] with the name of the package you want to install. Homebrew will automatically download and install the package for you.
That’s it! You have successfully installed Homebrew on your Mac M1. You can now enjoy the benefits of using Homebrew to easily install and manage software on your Mac.
What is Homebrew?
Homebrew is a package manager for macOS that allows you to easily install, update, and manage software packages on your Mac. It is a command-line tool that provides a convenient way to install various software packages and libraries that are not included in the default macOS installation.
With Homebrew, you can install a wide range of software packages, including command-line tools, programming languages, development libraries, and more. It simplifies the process of installing software by automatically resolving dependencies and handling the installation process for you.
Homebrew is especially useful for developers and power users who frequently need to install and manage software packages on their Mac. It provides a centralized and efficient way to keep your software up to date and easily install new packages as needed.
Homebrew is compatible with the new Apple Silicon M1 chip, so you can use it to install software on your M1 Mac without any issues. It takes advantage of the power and performance of the M1 chip to provide a seamless and efficient package management experience.
Overall, Homebrew is a powerful and flexible tool that makes it easy to install and manage software packages on your Mac. Whether you’re a developer, power user, or just someone who wants to easily install software on their Mac, Homebrew is a valuable tool to have.
Why Install Homebrew on Mac M1?
Installing Homebrew on your Mac M1 can provide you with a convenient and efficient way to manage software packages and dependencies. Homebrew is a package manager that allows you to easily install, update, and remove software packages from the command line.
By installing Homebrew on your Mac M1, you gain access to a vast library of open-source software that can enhance your productivity and expand the capabilities of your machine. Whether you need development tools, multimedia applications, or command-line utilities, Homebrew makes it easy to find and install the software you need.
Homebrew is also designed to work seamlessly with the Mac M1 architecture, providing optimized performance and compatibility. With Homebrew, you can take full advantage of the power and capabilities of your Mac M1, ensuring that your software runs smoothly and efficiently.
Furthermore, Homebrew simplifies the process of managing software updates. Instead of manually searching for updates and downloading them from various sources, Homebrew allows you to update all your installed packages with a single command. This saves you time and effort, ensuring that your software is always up to date and secure.
In addition, Homebrew provides a centralized and organized approach to managing software dependencies. It automatically resolves dependencies and ensures that all required libraries and frameworks are installed correctly. This eliminates the hassle of manually managing dependencies and reduces the risk of compatibility issues.
Overall, installing Homebrew on your Mac M1 is a wise choice that can greatly enhance your software management experience. It provides a user-friendly interface, optimized performance, and a vast library of software packages, making it an essential tool for any Mac M1 user.
Step 1: Install Rosetta 2
To install Homebrew on your Mac M1, you first need to install Rosetta 2. Rosetta 2 is a translation process that allows you to run software that is not yet optimized for the M1 chip.
To install Rosetta 2, follow these steps:
- Open a Terminal window on your Mac M1.
- Type the following command and press Enter:
- Wait for the installation process to complete. This may take a few minutes.
- Once the installation is finished, you can proceed to the next step to install Homebrew.
softwareupdate --install-rosetta
By installing Rosetta 2, you ensure that your Mac M1 is capable of running software that is not yet compatible with the M1 chip. This will allow you to install and use Homebrew without any issues.
What is Rosetta 2?
Rosetta 2 is a translation process that allows Mac users with Apple Silicon, such as the M1 chip, to run apps that were designed for Intel-based Macs. It is a key component in the transition from Intel processors to Apple Silicon.
When you install Homebrew on your Mac, Rosetta 2 is automatically installed as well. This is because Homebrew relies on many open-source packages and libraries that were originally built for Intel-based Macs. Rosetta 2 ensures that these packages and libraries can still be used on your M1 Mac.
With Rosetta 2, you can seamlessly install and run Homebrew on your M1 Mac, just like you would on an Intel-based Mac. It translates the commands and code used by Homebrew into a format that is compatible with the M1 chip, allowing you to install and use a wide range of software and tools.
Overall, Rosetta 2 is an essential tool for M1 Mac users who want to take advantage of the vast software ecosystem that Homebrew offers. It ensures compatibility and allows you to enjoy the benefits of Homebrew on your new Mac.

