Are you a fan of mods? Do you enjoy customizing your gaming experience? If so, you’ve probably heard of modpacks. Modpacks are collections of mods that can be added to a game to enhance its features and gameplay. But how exactly do you add mods to a modpack? In this step-by-step guide, we will show you how to do just that.
Step 1: Choose a Modpack
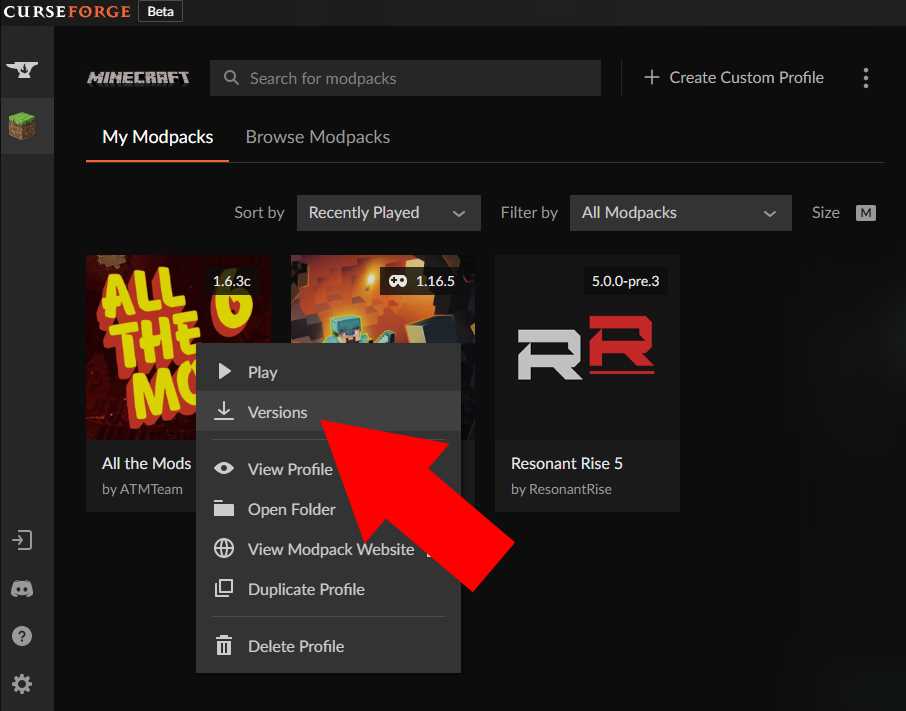
The first step in adding mods to a modpack is to choose the modpack you want to modify. There are thousands of modpacks available online, so take your time to find one that suits your preferences. Once you have chosen a modpack, download it and make sure to save it in a location that you can easily access.
Step 2: Install a Mod Loader
Before you can start adding mods to your modpack, you will need to install a mod loader. A mod loader is a program that allows you to manage and install mods for a specific game. There are several mod loaders available, such as Forge and Fabric, so choose one that is compatible with your modpack.
Step 3: Find Mods
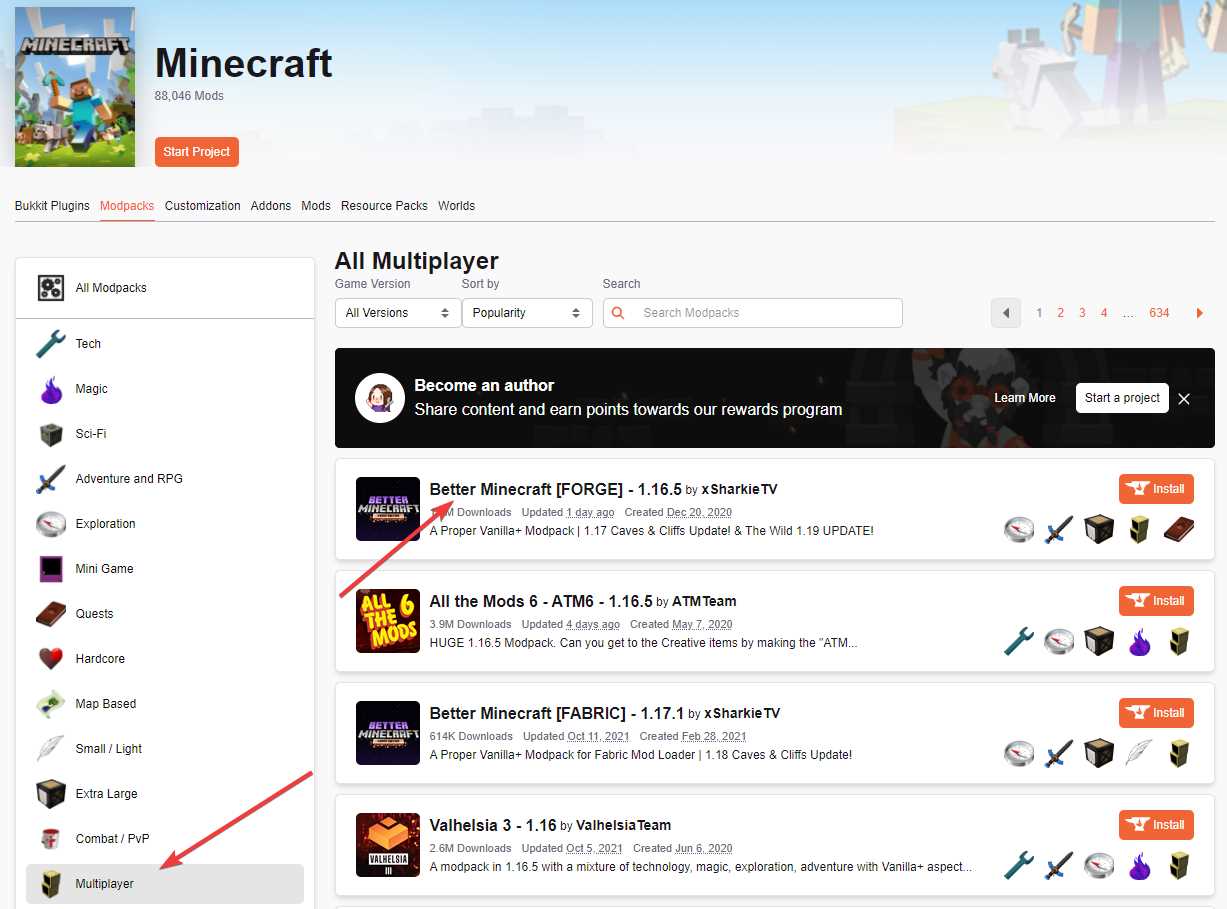
Now that you have a modpack and a mod loader installed, it’s time to find the mods you want to add. There are many websites and forums dedicated to hosting mods, such as CurseForge and Minecraft Forum. Browse through these platforms and look for mods that are compatible with your modpack and game version.
Step 4: Install Mods
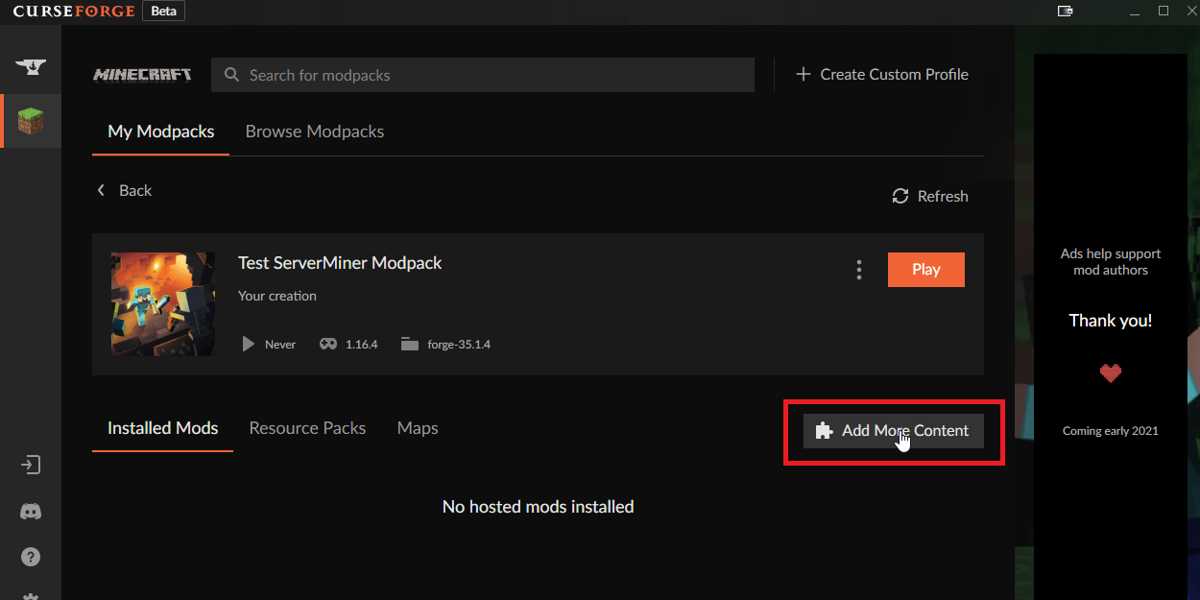
Once you have found the mods you want to add, download them and save them in a separate folder. Open your mod loader and locate the “mods” folder. Copy the downloaded mods into this folder. Make sure to follow any specific installation instructions provided by the mod creators.
Step 5: Launch the Modpack
With the mods installed, it’s time to launch your modpack. Open your game launcher and select the modpack you modified. Make sure to allocate enough memory to the game to prevent any performance issues. Once the game is launched, you should see the mods you added in action.
Adding mods to a modpack can be a fun and rewarding experience. By following this step-by-step guide, you can easily customize your gaming experience and explore new possibilities. So go ahead, choose a modpack, find some mods, and start adding them to your game!
Section 1: Preparing the Modpack
Before you can add mods to a modpack, you need to make sure that the modpack is set up and ready to go. This involves a few steps to ensure that everything is in order and that the mods can be added seamlessly.
Step 1: Start by creating a new modpack or selecting an existing one that you want to add mods to. Make sure that the modpack is compatible with the mods you want to add. Some mods may require specific versions of Minecraft or other mods to work properly.
Step 2: Next, make a backup of your modpack. This is an important step to take in case anything goes wrong during the mod installation process. It’s always better to be safe than sorry, so make sure you have a copy of your modpack saved somewhere else.
Step 3: Once you have a backup, it’s time to add the mods to your modpack. Start by downloading the mods you want to add. Make sure to download the correct versions of the mods that are compatible with your modpack.
Step 4: After downloading the mods, locate the modpack folder on your computer. This is where all the files for your modpack are stored. Open the folder and look for a folder called “mods” or something similar. This is where you will be adding the mods.
Step 5: Copy the downloaded mods into the “mods” folder. Make sure to copy the entire mod files and not just the zip or jar files. Some mods may come in a zip or jar file, so you may need to extract the files before copying them into the “mods” folder.
Step 6: Once you have copied the mods into the “mods” folder, you can launch your modpack and see if the mods have been successfully added. If everything is working correctly, you should be able to see the mods in the modpack’s menu or in-game.
By following these steps, you can add mods to your modpack and enhance your Minecraft experience. Remember to always double-check compatibility and make backups before making any changes to your modpack.
Gathering the Required Mods
Before you can add mods to your modpack, you need to gather the necessary mods. Mods are modifications to the game that add new features, items, or functionality. They can enhance your gameplay experience and add new challenges or opportunities.
To gather the required mods, you first need to identify the specific mods you want to add to your modpack. You can do this by researching popular mods, browsing modding forums, or asking for recommendations from other players. Once you have a list of mods you want to add, you can start downloading them.
Most mods can be found on modding websites or forums. Look for the official websites or download links provided by the mod creators. Make sure to download the correct version of the mod that is compatible with your game version and modpack. Some mods may also require additional dependencies or libraries, so be sure to read the mod descriptions and installation instructions carefully.
When downloading mods, it’s important to only download from trusted sources to avoid malware or viruses. Stick to reputable modding websites or forums that have a good reputation and positive user reviews. Additionally, always scan downloaded files with an antivirus program before installing them.
Once you have downloaded the mods, you can add them to your modpack. This typically involves placing the mod files in the appropriate folder or directory of your game installation. The exact process may vary depending on the game and modpack, so be sure to consult the modpack’s documentation or installation instructions for specific guidance.
Remember to only add mods that are compatible with your game version and modpack. Adding incompatible mods can cause crashes, errors, or other issues with your game. It’s also a good idea to make backups of your game files before adding mods, in case you need to revert any changes or troubleshoot any problems that may arise.
Now that you know how to gather the required mods, you can start adding them to your modpack and enjoy a customized and enhanced gaming experience!
Checking Mod Compatibility
Before adding mods to your modpack, it is crucial to check their compatibility with each other and with the version of the game you are using. Incompatible mods can cause crashes, glitches, or other issues that can ruin your gaming experience.
To check mod compatibility, follow these steps:
- Research the mods you want to add: Read the mod descriptions, reviews, and forums to see if there are any known compatibility issues. Mod developers often provide information about which versions of the game their mods are compatible with.
- Check for dependencies: Some mods require other mods to be installed in order to work properly. Make sure to check if any of the mods you want to add have dependencies and install them accordingly.
- Use a mod compatibility tool: There are several tools available that can help you check the compatibility of mods. These tools analyze the mods you have installed and provide information about any conflicts or compatibility issues. One popular tool is the Minecraft Mod Compatibility Checker.
- Test your modpack: After adding mods to your modpack, it is essential to test it thoroughly. Launch the game and play for a while to see if there are any crashes, errors, or other issues. If you encounter any problems, try removing or replacing the mods that are causing them.
By following these steps, you can ensure that the mods you add to your modpack are compatible with each other and with the game, providing you with a smooth and enjoyable gaming experience.
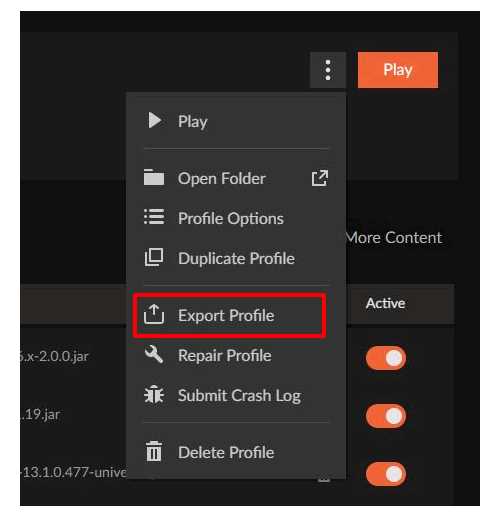
Creating a Backup of the Modpack
Before you start adding mods to your modpack, it’s always a good idea to create a backup of the existing modpack. This way, if anything goes wrong during the mod installation process, you can easily revert back to the original version.
To create a backup of your modpack, follow these steps:
| Step 1: | Locate the folder where your modpack is installed. This is usually in the “Mods” folder within your game’s directory. |
| Step 2: | Copy the entire modpack folder and paste it in a different location on your computer. You can choose any location you prefer, such as your desktop or a separate folder. |
| Step 3: | Rename the copied folder to indicate that it is a backup. For example, you can add “backup” or the current date to the folder name. |
By following these steps, you will have successfully created a backup of your modpack. Now you can proceed with adding mods to your modpack without worrying about losing the original version.
Section 2: Installing Mods

Now that you have your modpack set up, it’s time to add some mods! Adding mods to your modpack can enhance your gameplay experience and add new features to the game. Here’s a step-by-step guide on how to add mods to your modpack:
Step 1: Find Mods
First, you need to find the mods you want to add to your modpack. There are several websites and forums where you can find mods for different games. Look for mods that are compatible with the version of the game you are playing.
Step 2: Download Mods
Once you have found the mods you want to add, download them to your computer. Make sure to save them in a location that you can easily access later.
Step 3: Install Mods
Next, you need to install the mods into your modpack. Open the modpack folder and look for a folder called “mods” or “modpacks”. This is where you will place the mod files.
Step 4: Add Mods to Modpack
Copy the downloaded mod files and paste them into the “mods” or “modpacks” folder. Make sure to follow any specific instructions provided by the mod creators.
Step 5: Launch Modpack
Once you have added the mods to your modpack, launch the game and select your modpack from the list of available modpacks. The mods should now be loaded and ready to use in your gameplay.
Step 6: Test Mods
Before diving into your gameplay, it’s a good idea to test the mods to make sure they are working correctly. Play the game and check if the mods are functioning as intended. If you encounter any issues, refer to the mod’s documentation or seek help from the mod’s community.
That’s it! You now know how to add mods to your modpack. Enjoy exploring new features and enhancing your gaming experience with the added mods.
Downloading the Mods
To add mods to a modpack, you first need to download the mods you want to include. Here is a step-by-step guide on how to download mods:
- Start by finding a reliable source for downloading mods. There are several websites and forums dedicated to hosting mods for various games.
- Once you have found a website or forum that offers the mods you want, navigate to the mod’s page.
- On the mod’s page, look for a download button or link. Click on it to start the download.
- Depending on the website or forum, you may be redirected to another page or asked to confirm the download. Follow the instructions provided to proceed with the download.
- Once the download is complete, you will have a file with the mod’s extension (e.g., .jar, .zip). Make sure to keep track of where you save the file on your computer.
- Repeat the process for each mod you want to download for your modpack.
By following these steps, you will be able to download the mods you need to add to your modpack.
Extracting the Mod Files

Once you have downloaded the modpack that you want to add mods to, the next step is to extract the mod files. This process will allow you to access the individual mod files that you will be adding to the modpack.
To extract the mod files, follow these steps:
- Locate the downloaded modpack file on your computer. It is usually in the form of a .zip or .jar file.
- Right-click on the modpack file and select “Extract” or “Extract Here” from the context menu. This will create a new folder containing the modpack files.
- Open the newly created folder and look for a folder named “mods” or something similar. This is where you will be adding the individual mod files.
- Open the “mods” folder and leave it open in the background.
Now that you have extracted the mod files and have the “mods” folder open, you are ready to add the mods to the modpack. Continue reading to learn how to add a mod to a modpack.
Placing the Mods in the Modpack Folder

To add mods to a modpack, you need to place the mod files in the modpack folder. Here’s how you can do it:
- First, locate the modpack folder on your computer. This is usually found in the “Minecraft” or “Mods” folder, depending on the modpack you are using.
- Open the modpack folder and create a new folder called “mods” if it doesn’t already exist. This is where you will place all the mod files.
- Next, download the mods you want to add to the modpack. Make sure to download the correct version of the mods that are compatible with your modpack.
- Once you have downloaded the mods, open the downloaded files and extract the mod files. These files usually have a “.jar” or “.zip” extension.
- Copy the extracted mod files and paste them into the “mods” folder in the modpack folder. You can do this by right-clicking on the mod files and selecting “Copy”, then navigating to the modpack folder and right-clicking inside the “mods” folder and selecting “Paste”.
- After placing the mods in the modpack folder, you can launch the modpack and the mods should be loaded and ready to use in your game.
By following these steps, you can easily add mods to your modpack and enhance your Minecraft gameplay with new features and content.
Section 3: Configuring the Mods
Once you have successfully added the mods to your modpack, the next step is to configure them to ensure they work properly and integrate seamlessly with your game. Configuring the mods is an essential part of the process, as it allows you to customize their settings and make them compatible with your specific needs.
Here is a step-by-step guide on how to configure the mods:
- Identify the mods: Before you can start configuring the mods, you need to know which mods you have added to your modpack. Make a list of all the mods you have installed.
- Access the mod configuration files: Most mods come with configuration files that allow you to customize their settings. These files are usually located in the “config” folder of your modpack.
- Open the configuration files: Use a text editor to open the configuration files of the mods you want to configure. You can use any text editor, such as Notepad or Sublime Text.
- Modify the settings: Once you have opened the configuration files, you can modify the settings according to your preferences. Each mod will have its own set of options and parameters that you can adjust.
- Save the changes: After you have made the necessary modifications, save the configuration files. Make sure to save them in the correct format specified by the mod.
- Test the mods: Once you have configured the mods, it’s important to test them in your game to ensure they are working as intended. Launch your game and check if the mods are functioning correctly.
- Make further adjustments if needed: If you encounter any issues or want to make further adjustments to the mods, you can repeat the configuration process and modify the settings accordingly.
By following these steps, you will be able to configure the mods in your modpack and customize them to enhance your gaming experience. Remember to always save your changes and test the mods to ensure they are working properly.