
When it comes to team communication, chat history can quickly pile up and become overwhelming. Whether you need to delete sensitive information, clean up clutter, or simply start fresh, knowing how to clear your team chat history is essential. In this step-by-step guide, we will walk you through the process of erasing, removing, and wiping your team’s chat history, ensuring a clean slate for your future conversations.
Step 1: Identify the chat platform
The first step in clearing your team chat history is to identify the chat platform you are using. Different platforms have different methods for deleting chat history, so it’s important to know which one you are working with. Whether it’s Slack, Microsoft Teams, or any other popular chat platform, each one will have its own unique set of instructions.
Step 2: Access the chat settings
Once you have identified the chat platform, the next step is to access the chat settings. Look for an option that allows you to manage or customize your chat settings. This is where you will find the tools to delete or clear your team chat history.
Step 3: Delete or clear chat history
Now that you have accessed the chat settings, it’s time to delete or clear your team chat history. Depending on the platform, you may have the option to delete individual messages, entire conversations, or even wipe the entire chat history clean. Follow the platform-specific instructions to ensure you are removing the desired chat history.
Step 4: Confirm the deletion
Before finalizing the deletion, it’s important to double-check your actions. Confirm that you are deleting the correct chat history and that you won’t lose any important information in the process. Once you are certain, proceed with the deletion.
Step 5: Start fresh
With your team chat history successfully deleted, it’s time to start fresh. Encourage your team members to embrace the clean slate and use this opportunity to establish new communication practices. Remember to regularly clean up your chat history to avoid clutter and maintain a streamlined communication process.
By following these step-by-step instructions, you can easily delete, clean, and clear your team chat history. Whether you need to remove sensitive information or simply declutter your chat platform, this guide will help you achieve a fresh start for your team’s communication.
Why Clearing Team Chat History is Important
Clearing team chat history is an essential practice in maintaining a secure and efficient communication environment. By regularly erasing chat history, teams can ensure that sensitive information is not accessible to unauthorized individuals.
When team members communicate through chat, a record of their conversations is created and stored. Over time, this chat history can accumulate a significant amount of data, including confidential discussions, private files, and personal information. If left unattended, this information can pose a security risk if it falls into the wrong hands.
By regularly wiping team chat history, organizations can mitigate the risk of data breaches and unauthorized access. Clearing chat history ensures that any sensitive information shared in previous conversations is permanently removed from the system, reducing the chances of it being exploited.
In addition to security concerns, clearing team chat history also promotes better organization and productivity. As chat history grows, it becomes more challenging to find relevant information quickly. By removing unnecessary conversations, team members can focus on the most important and current discussions, improving efficiency and collaboration.
Furthermore, clearing chat history can help maintain a clutter-free communication environment. Unnecessary or outdated conversations can clutter the chat interface, making it difficult to navigate and find important messages. By regularly deleting chat history, teams can keep their chat platforms clean and organized, ensuring that important messages are easily accessible.
Clearing team chat history is a simple yet effective way to enhance security, organization, and productivity within a team. By implementing a regular clearing policy, teams can maintain a secure and efficient communication environment, free from unnecessary clutter and potential security risks.
Ensuring Privacy and Security
When it comes to team chat, privacy and security are of utmost importance. It is crucial to ensure that sensitive information shared in team conversations remains confidential and protected from unauthorized access.
One way to enhance privacy and security is by regularly wiping the chat history. By removing or erasing the chat history, you can minimize the risk of any sensitive information being exposed or accessed by unauthorized individuals.
Deleting the chat history not only helps protect sensitive information but also ensures that any previous conversations are cleared, leaving no trace behind. This can be particularly useful in situations where you need to maintain a high level of confidentiality, such as discussing proprietary business strategies or sharing personal information.
Clearing the team chat history is a simple process that can be done by following a few steps. By regularly deleting the chat history, you can maintain a clean and secure environment for your team’s communication.
It is important to note that while clearing the chat history can enhance privacy and security, it is also essential to implement other security measures, such as using strong passwords and enabling two-factor authentication, to further protect your team’s conversations.
In conclusion, ensuring privacy and security in team chat involves regularly wiping the chat history and implementing additional security measures. By taking these steps, you can create a safe and confidential environment for your team’s communication.
Improving Performance and Efficiency
Clearing your team chat history can help improve performance and efficiency in several ways:
- Wipe out unnecessary data: By removing old chat history, you can free up storage space and reduce the amount of data that needs to be processed.
- Remove distractions: Having a clutter-free chat history allows team members to focus on current conversations and tasks without being distracted by past discussions.
- Delete outdated information: Clearing the chat history helps to ensure that team members are not referring to outdated or irrelevant information, leading to more accurate and efficient communication.
- Erase sensitive information: Clearing the chat history can help protect sensitive data and prevent unauthorized access to confidential information.
- Clean up the interface: Removing old chat history can improve the overall user experience by providing a cleaner and more organized interface.
By regularly clearing your team chat history, you can optimize performance, enhance efficiency, and create a more productive work environment for your team.
Maintaining a Clean and Organized Workspace
Keeping a clean and organized workspace is essential for productivity and efficiency. When your workspace is cluttered, it can be difficult to focus and find what you need. Here are some tips to help you maintain a clean and organized workspace:
1. Wipe down surfaces regularly: Dust and dirt can accumulate on your desk, keyboard, and other surfaces. Take a few minutes each day to wipe them down with a damp cloth or disinfectant wipe to keep them clean and germ-free.
2. Clean out unnecessary items: Take a look at your workspace and identify any items that you no longer need or use. Remove them from your desk or storage area to free up space and reduce clutter.
3. Erase digital clutter: Just like physical clutter, digital clutter can also impact your productivity. Take the time to delete or archive old emails, files, and documents that are no longer needed. This will help you find important information more easily and improve your overall digital organization.
4. Remove distractions: Chat notifications and other distractions can disrupt your workflow. Consider turning off notifications or setting specific times to check your team chat. This will help you stay focused on your tasks and prevent unnecessary interruptions.
5. Delete unnecessary chat history: Over time, your team chat history can become cluttered with old messages. Take the time to delete or clear out unnecessary chat history to keep your conversations organized and easy to navigate.
6. Clear your mind: In addition to maintaining a clean physical workspace, it’s important to clear your mind as well. Take breaks, practice mindfulness, and engage in activities that help you relax and recharge. This will help you stay focused and productive throughout the day.
By following these tips, you can create a clean and organized workspace that promotes productivity and efficiency. Remember to regularly clean and declutter your physical and digital space to maintain a clear and focused mind.
Step-by-Step Guide to Clear Team Chat History
Clearing your team chat history is an important step to maintain privacy and keep your conversations organized. Whether you want to wipe the slate clean or delete specific messages, here is a step-by-step guide to help you clear your team chat history:
1. Open the team chat application or platform that you are using.
2. Navigate to the chat history section or settings.
3. Look for the option to remove or clear chat history.
4. Click on the option to delete chat history.
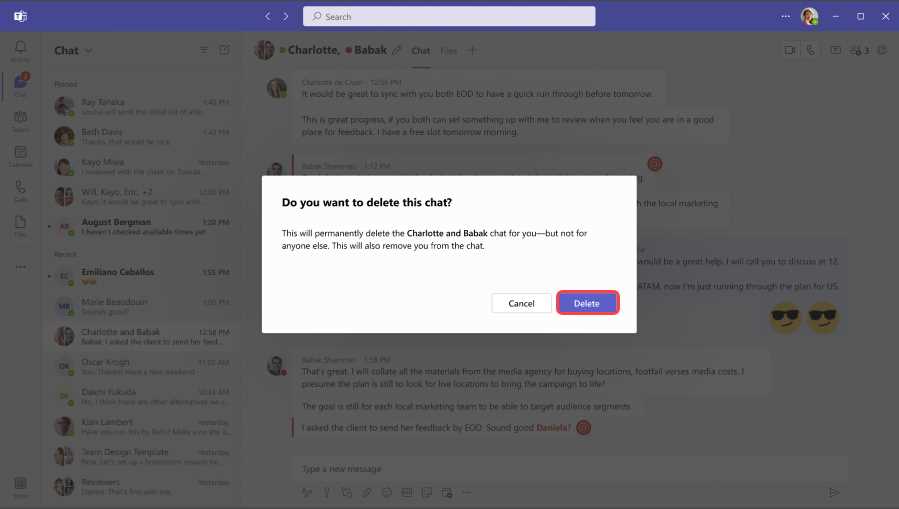
5. Confirm your decision to delete the chat history.
6. Wait for the process to complete.
7. Once the chat history is cleared, you will no longer be able to retrieve the deleted messages.
8. If you want to delete specific messages, select the messages you want to remove and follow the same steps.
9. Remember to double-check before deleting the chat history, as this action is irreversible.
By following these steps, you can easily remove or clear your team chat history, ensuring a fresh start and maintaining confidentiality.
Accessing the Chat History Settings
Clearing your team chat history is a simple process that can be done by accessing the chat history settings. By following these steps, you can erase, remove, or delete any unwanted chat messages from your team’s conversation.
To access the chat history settings, follow these steps:
- Open the team chat application on your device.
- Locate the settings menu. This is usually represented by a gear or cog icon.
- Click on the settings menu to open the options.
- Look for the “Chat History” or “History Settings” option.
- Click on the “Chat History” or “History Settings” option to access the settings.
Once you have accessed the chat history settings, you will be able to clear, wipe, or delete the chat history according to your preferences. Keep in mind that clearing the chat history will permanently remove all chat messages, so make sure to save any important information before proceeding.
By following these steps, you can easily access the chat history settings and remove any unwanted chat messages from your team’s conversation.
Selecting the Chat History to Clear
When it comes to managing your team’s chat history, it’s important to have the ability to erase or wipe conversations as needed. Clearing the chat history can help keep your team’s communication clean and organized, removing any unnecessary clutter.
To delete or remove specific chat history, you can follow these steps:
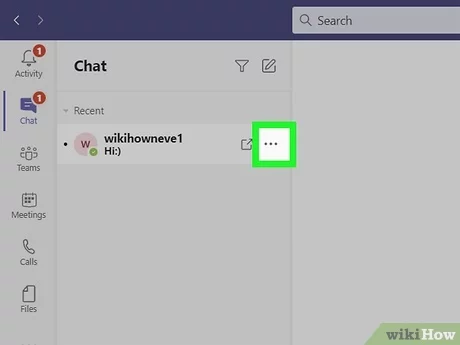
- Open the chat application or platform that you are using.
- Locate the chat history that you want to clear.
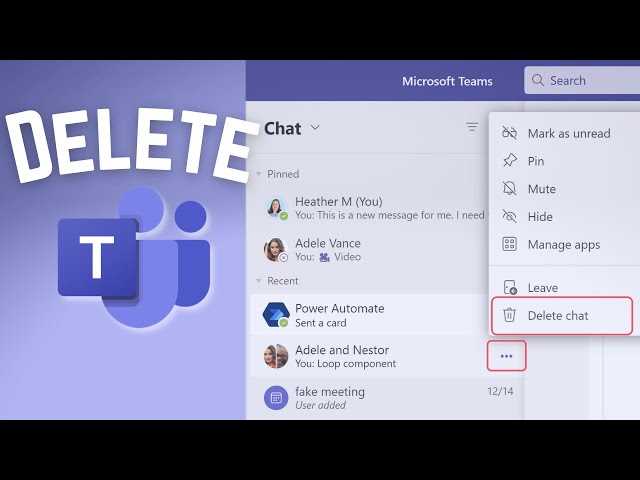
- Select the specific chat or conversation that you wish to delete.
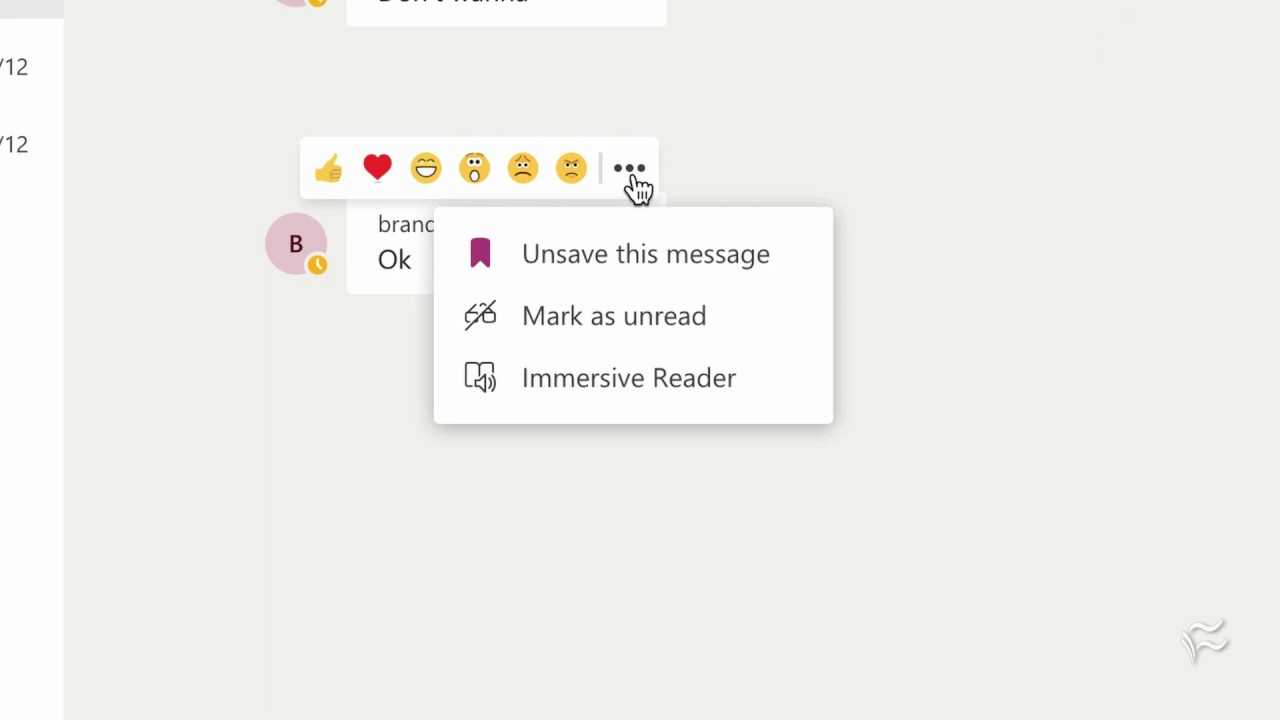
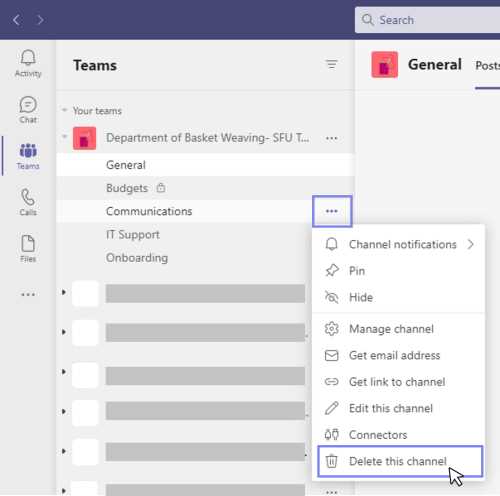
- Once you have selected the chat, look for the options or settings menu.
- Within the options or settings menu, find the “Clear” or “Delete” option.
- Click on the “Clear” or “Delete” option to remove the chat history.
- Confirm the action if prompted.
By following these steps, you can easily clear the chat history for a specific conversation. This allows you to keep your team’s chat history organized and free from unnecessary clutter. Remember to exercise caution when deleting chat history, as it cannot be recovered once it is cleared.


